Instrument Maintenance and Repair
5.1 Adjustment of Instrument Electronics
For optimum Dobson spectrophotometer performance during calibrations and observations it is imperative that the instrument electro-mechanical system be in proper adjustment. For spectrophotometers equipped with original (R. & J. Beck, Ltd.) electronics, a number of maintenance suggestions are provided by Dobson (1957a). In recent years, several new electro-mechanical systems have been devised for the Dobson instrument as improved replacements for the original vacuum tube circuitry and mechanical rectifier (Else et al., 1968; Olafson, 1968; Komhyr and Grass, 1972). Unique trouble-shooting procedures apply to each of these systems. Observers using spectrophotometers equipped with the new electro-mechanical systems should consult relevant documentation when repairing instruments.
5.2 Decrease in Shutter-Motor Speed
Provided that the motor speed is correct, the mechanical or electronic rectifier located within the spectrophotometer will reject the low-level 50- or 60-cycle alternating current component that is invariably present in the amplifier output signal. If the motor should become weakened, and its speed decrease, rectification of the 50- or 60-cycle current will cause a slow oscillation of the microammeter needle.
Correct shutter-motor speeds, shutter-motor gear ratios, shutter speeds, and instrument light-beam chopping frequencies for instruments operated on 50 Hz and 60 Hz power are specified in the table below.
    Power                     Shutter-Motor    Shutter         Light-Beam
   Frequency    Motor Speed    Gear Ratio       Speed       Chopping Frequency

    50 Hz       1500 r.p.m.     0.55          825 r.p.m.         27.5 Hz
    60 Hz       1800 r.p.m.     0.55          990 r.p.m.         33 Hz
Weakened motors not operating correctly at either 1500 or 1800 r.p.m. should be replaced. Temporary repair may be effected to increase shutter speed to the correct value in spectrophotometers equipped with original (R & J Beck, Ltd.) motors and friction drive pulleys by winding one or more turns of plastic electrical tape around the drive wheel on the motor shaft in order to increase its diameter. The tape should be located below the rubber band fitted over the drive wheel.
5.3 Phase-Sensitive Signal Rectification
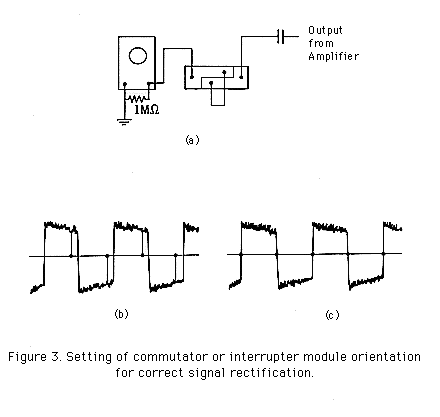
Phase-sensitive rectification of the signal emanating from the Dobson instrument's amplifier is employed to reject interfering electrical frequency components other than those of the instrument's light-beam chopping frequency. Some modernized Dobson spectrophotometers use photon coupled interrupter modules (light emitting diodes and phototransistors) mounted at the edge of the instrument's rotating shutter as trigger mechanisms for achieving correct signa1 rectification. Other spectrophotometers with updated electronics have photon coupled interrupter units mounted on their shutter shafts. Such instruments, as well as Dobson instruments equipped with original electro-mechanical systems having a mechanical rectifier-with-brushes (commutator) mounted on the shutter shaft, must have their interrupter or commutator units correctly oriented with respect to the shutter for proper signal rectification. The orientation must be such that changeover occurs as the a.c. signal from the amplifier passes through the zero value. The procedure for setting the interrupter module or commutator is as follows:
(1) Illuminate S1 with the standard lamp used in performing wedge calibration tests. Do not use the ground quartz plate.(2) Set Q levers for D wavelengths. Rotate the R dial away from balance position.
(3) Remove the left-hand plate in the cover of the instrument and cover the opening with a black cloth. Slightly loosen the interrupter or commuter holder so that it can just be rotated by hand.
(4) Clean the commutator face using a pad of lens tissue paper moistened with methyl alcohol.
(5) Connect an oscilloscope to the instrument as shown in Figure 3a. The positions of crossover will appear on the screen as indicated in Figure 3b if the holder is improperly oriented. If the holder is rotated to its correct position, the crossover points will fall on the signal trace as shown in Figure 3c.
(6) Clamp the module holder in position once the correct setting has been determined.
5.4 Cleaning the Commutator
Experience has shown that mechanical commutators used in Dobson instruments equipped with original electro-mechanical systems require frequent cleaning. This is readily done by removing the left-hand lid in the instrument cover and pressing a small pad of cloth or lens tissue paper moistened with alcohol against the face of the commutator while it is running. Tweezers may be used to grasp the cloth or paper. Do not use an excessive amount of alcohol since it may be thrown off in a spray by the rotating commutator and contaminate some of the optical components.
Test the resistance of all four brushes in series by connecting the microammeter terminals and measuring the resistance between the other two brushes. The resistance should not be more than a few hundred ohms at most, and when the brushes are newly cleaned it will be only a few ohms. Note that if the brushes vibrate the resistance will increase because of complete break of connections while the brushes are off the commutator.
Figure 3. Setting of commutator or interrupter module orientation for correct signal rectification.
5.5 Radio-Frequency Pickup
If the spectrophotometer is being operated close to a transmitter, spurious positive or negative deflections of the microammeter needle may occur. It is possible to eliminate, or decrease the magnitude of, these deflections by keeping the two leads connecting the microammeter to the spectrophotometer as short as possible, and by intertwining the leads. Grounding the spectrophotometer will also help. On some instruments the cover does not make electrical contact with the instrument base. This can cause problems with power-line as well as radio-frequency pickup.
5.6 Mechanical Shock Avoidance
Every effort should be made to avoid exposure of the instrument to mechanical shock in order to prevent inadvertent displacement of its optical components. The cover should not be removed unless it is essential to do so. Great care must be taken when replacing the cover to ensure that the support for the dial and zero index is not jarred.
5.7 Instrument Temperature Control
Quilted covers supplied with spectrophotometers should be used with instruments that are wheeled outside for observations. Additional temperature control in cold climates can be obtained by wrapping the instruments in thermostatically controlled electric blankets. Cut suitable apertures in the blanket to provide access to instrument controls. The quilted cover supplied with the spectrophotometer should be placed over the instrument and blanket.
5.8 Renewing the Desiccant
Examine the drying vessels within the spectrophotometer and renew the silica gel, if necessary. (The inside of the instrument must be kept dry to maintain good electrical insulation and to prevent moisture from condensing on the optical parts of the instrument. Such condensation makes all the readings false.) An indicator-type silica gel is used which changes color when it becomes damp. When dry, it is blue; when damp, it turns pink. The damp silica gel may be renewed by heating it in an oven for an hour or two at 200°C to 300°C. Note that all the drying vessels can be changed by opening the lids in the top of the spectrophotometer cover. In damp weather, it may be necessary to change the silica gel more often than once per month. A small desiccant test unit is located in the spectrophotometer near the thermometer. This unit is easily removed for inspection to determine whether the silica gel needs renewing.
5.9 Cleaning Optical Components
On the few occasions when optical parts require cleaning, very great care must be taken not to displace prisms, lenses, and mirrors in any way.
In general, light brushing with a camel's hair brush and blowing with an air squirt will suffice to rid optical surfaces of lint and dust. If additional cleaning is needed, a recommended procedure is to clean first with lint-free lens tissue moistened with reagent grade methyl alcohol, then clean with lens tissue moistened with distilled water, and finally, polish with dry lens tissue. An exception applies to cleaning the front-silvered spectrophotometer mirrors M1 and M2, which should be cleaned only as a last resort. If they become extremely dirty, they may be cleaned very lightly with cotton wool well moistened first with distilled water, and then alcohol. A mild, non- alkaline detergent may also be used. TAKE GREAT CARE NOT TO SCRATCH THE MIRROR SURFACES!
The inside of the spectrophotometer must be kept free from grease and oil. Do not grease the optical wedge tracks. If the dial sticks, use an air squirt to blow the metal dust off the wedge tracks. Oil on the optical components may change the calibration of the spectrophotometer markedly since certain types of oil readily absorb ultraviolet light.
Periodically examine the sun director for cleanliness. Remove any dust that has accumulated on it. Clean the lens and prism using, if necessary, alcohol, distilled water, and lens tissue paper. If the prism is removed for cleaning, its orientation must be carefully noted in order that it may be replaced in its original position. Quartz prisms are birefringent, except through one face.
Periodically remove the ground quartz plate from its holder and wash it with soap and water. Rinse it well with water and dry it with a clean cloth or tissue paper before replacing it in its mount. Avoid touching the quartz plate with your fingers since an oily residue may be left on it.
5.10 Exposure of Photomultiplier to Intense Light
If the photomultiplier is exposed to strong light its spectral characteristics may be temporarily altered and erroneous instrument dial readings may result. It is necessary, therefore, to darken the room as much as is convenient before opening the lid of the instrument. For the same reason, direct sun focused image type observations must not be made when the sun's zenith angle is less than about 67 degrees. The intense sunlight may damage the photosensitive cathode of the photomultiplier. Also, never remove the spectrophotometer cover or cover lids before switching off the photomultiplier high voltage power supply, or the photomultiplier may be permanently damaged.
If the photomultiplier is accidentally exposed to strong light, then standard lamp tests should be performed at intervals of several days until lamp readings stabilize.
5.11 Replacing Standard Lamps
The spectrophotometer should normally be provided with two or more standard lamps, A, B, C, etc., that are used periodically in checking the state of calibration of the instrument. If lamp A or lamp B should burn out or be accidentally broken, a new replacement lamp should be wired for use.
It is important that the new lamp be correctly positioned over the spectrophotometer inlet window before use, particularly if the lamp is of the ultraviolet glass envelope variety that has a C-shaped tungsten filament. Correct positioning of the lamp is effected by impressing a small voltage across the lamp so that the filament becomes visible, and adjusting the lamp in its holder so that the C-shaped filament is situated symmetrically over the spectrophotometer inlet window with the back of the C pointing downward. Mark this position of the lamp by drilling a small hole in the lamp base in line with the hole present in the lamp holder. All future tests with the new lamp must be performed with the lamp correctly positioned; otherwise, erroneous data will result.
After wiring the lamp for use, operate it for about 10 hours at rated voltage or current to stabilize its spectral characteristics. Several days later, perform standard lamp tests using the new and remaining old lamps. When routine standard lamp tests are performed the next several times, all lamps should again be used since it is important that sufficient valid comparison data be obtained for the new lamps before incorporating the lamps into the routine spectrophotometer tests program.
5.12 Replacing a Photomultiplier Tube
The spectrophotometer photomultiplier tube is located in a "light-tight" box whose cover should not be removed except when it becomes necessary to replace the tube. Also, the position of the tube within the box must not be disturbed since the overall instrument calibration may be affected.
Photomultipliers used in spectrophotometers have been specially selected for high gain and signal-to-noise ratio. An instrument having an excellent quality tube within it will yield a half-voltage trace width of 1 degree when a sensitivity test is performed. Poorer quality photo multipliers may give rise to trace widths of 3 to 5 degrees.
When installing a new photomultiplier in an instrument, it is important to position the tube correctly with respect to the light beam falling on its cathode. Although adjustments in the vertical and horizontal directions are possible, correct vertical positioning of the tube is most important. To position the photomultiplier correctly in the vertical direction proceed as follows:
(1) Insert the new photomultiplier into the tube socket and fix it firmly in place using the support provided. (Take care not to handle the tube envelope with your fingers since an oily residue may be left on the glass which may later affect the instrument calibration.) Replace the light-tight box cover and also the spectrophotometer cover.(2) Set up the instrument as you would in performing a routine mercury lamp test.
(3) After waiting 10 minutes for the mercury lamp to warm up, set Q2 lever to approximately 84°, and Q1 lever for maximum galvanometer deflection, say, 16 microamperes.
(4) Now move Q2 lever slowly upward while carefully watching the galvanometer reading. If the reading increases to a new maximum at some lower Q dial reading, say, 76°, the photomultiplier must be displaced downward.
(5) If no new maximum is observed, move the Q2 lever slowly downward, starting at 84°. If the galvanometer reading then increases to a new maximum at some higher dial reading, say, 95°, the photomultiplier must be displaced upward.
(6) Displacement of the tube about the vertical direction is accomplished by loosening four screws holding the light-tight tube box to the instrument frame.
(7) Repeat steps (3) to (6) until maximum galvanometer reading occurs with the Q2 lever set at approximately 84°. This is an indication that the photomultiplier is correctly positioned. It is generally found that the optimum setting of the photomultiplier occurs with the tube box set as far down as possible.
(8) After completing step (7), test for correct photomultiplier position by performing test 12 described by Dobson (1957b). If this test is not passed, further adjustment of photomultiplier position is necessary.
Insertion of a new photomultiplier into a spectrophotometer will invariably result in a small change in the spectral characteristics of the instrument as a whole. To compensate for any such change by determining appropriate corrections to be applied to the NA, NB, NC, and ND tables, a standard lamp test must be performed after the new tube is installed and again several days later. The procedure to be used in determining appropriate corrections to the N tables is outlined in Appendix E.
Return to Table of Contents
Forward to Section 6. Observations